
App Quick Start
From installing the desktop app to completing your first task takes about 10 minutes.
Why Use the Desktop App
The Web client is the "remote control" for your workspace, while the desktop app (GWork) is the true "execution end." Only the app can:
- ✅ Read and write local files (organize directories, generate reports, modify code)
- ✅ Run commands (npm install, git operations, run scripts)
- ✅ Connect to IM channels (Telegram, WhatsApp, Discord, Slack, Teams, WeChat, DingTalk)
- ✅ Create scheduled tasks (run automatically every day / week, notification push)
- ✅ Use your own LLM keys (Owner Key mode) in addition to the organization's models
- ✅ Install tools and skills from the Market (MCP tools, office / search / design skills)
- ✅ Sandboxed execution (run untrusted code in an isolated Linux environment)
- ✅ Manage personal memory (entries, knowledge graph)
- ✅ Act as a Work Node that other devices or teammates can dispatch tasks to
Although the Web client has a lighter interface, all "hands-on" capabilities must be provided by at least one app node.
Step 1 · Download and Install
Get the Installer
| Source | Description |
|---|---|
| Web download button | Log in to the Web client (https://www.gptbots.ai/workspace) and click the ⬇️ APP Download button at the bottom left to get the latest installer |
| Internal distribution | Enterprise Edition users may have a dedicated download link; please contact your administrator |
Platform Support
| Platform | File | Installation Method |
|---|---|---|
| macOS (Intel / Apple Silicon) | .dmg |
Double-click to open, then drag to Applications |
| Windows | .exe or .msi |
Double-click to run the installer |
| Linux | .AppImage |
Grant execute permission and run directly |
Step 2 · Launch and Log In
- Find GWork in your application list or Launchpad and launch it
- The login screen appears on first launch
- Log in with the same enterprise account you use on the Web client (email/phone number/SSO)
- After a successful login, the app automatically registers this device as a Work Node
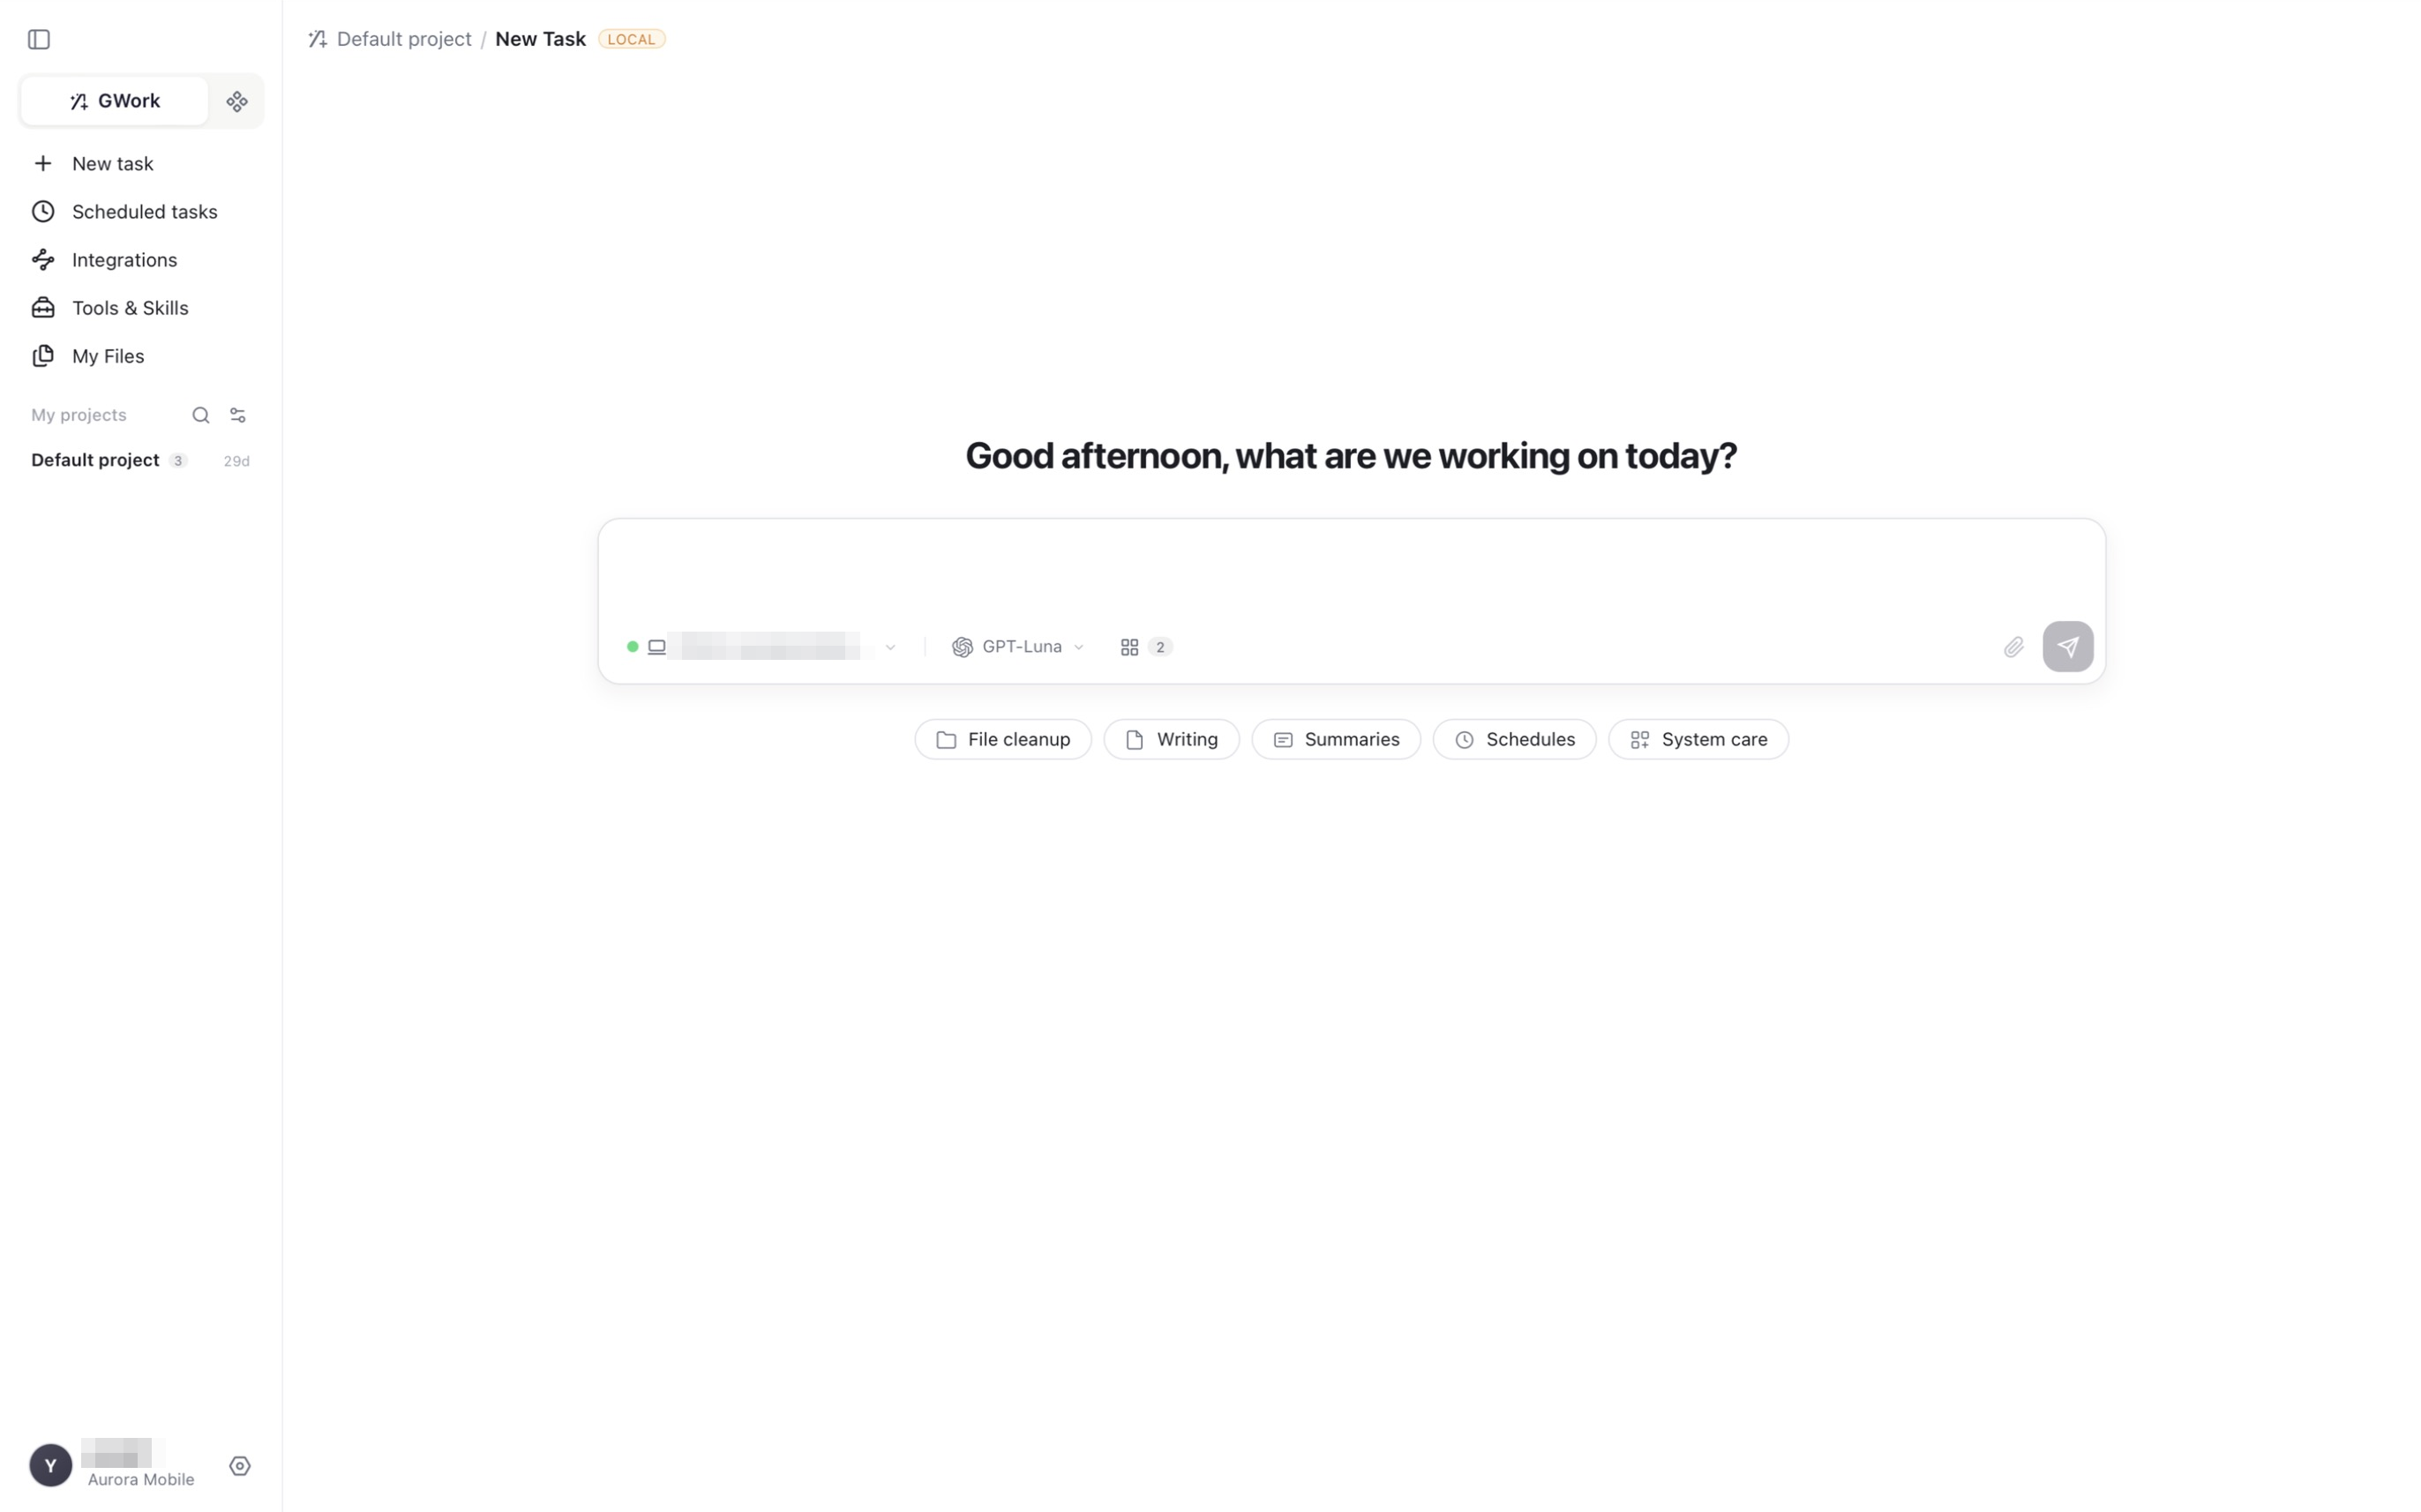
After logging in you land on the New task page. The left navigation is, in order,
New task / Scheduled tasks / Integrations / Tools & Skills / My Files, followed by your My projects list. The bottom-left shows your nickname and organization, and the ⚙ Settings button.
Step 3 · Check the Model
By default the app uses the models managed by your organization (Enterprise Key), so there is nothing to configure — the model selector below the input box already lists them.
If you want to use your own API keys instead:
- Click ⚙ Settings at the bottom left
- Select Model Management under Global settings
- Switch Model Service to Owner Key
- Pick a provider in the left list (OpenAI, Anthropic, Gemini, DeepSeek, Qwen, …), enter the API Base URL and API Key, choose the LLM Protocol, and click Test Connection
- Enable the provider with its toggle; its models now appear in the model selector
For details, see Model Configuration.
Step 4 · Your First Conversation
On the New task page:
- Below the input box you'll see:
- Work Node:
GWork (your computer name)— the device the task runs on - Model: the model currently in use (click to switch)
- Tools / Skills count badge
- Work Node:
- Enter a task (for example,
List all files on my desktop), or pick one of the suggestions (File cleanup,Writing,Summaries,Schedules,System care) - Press
Enterto send
The Agent will:
- Automatically call the
Browse foldertool - Stream the execution process in real time (each tool call is listed in the conversation)
- Output the result when finished; produced files also appear under My Files
Step 5 · Try Real Tool Calls
Try some more complex tasks to get a feel for the Agent Loop:
A Task That Requires Confirmation
Create a hello.txt file on the desktop for me, with the content "Hello from GWork"
→ The Agent calls Write file (a P1 Standard tool) and a permission card appears in the conversation: "GWork needs your approval · change a file on your computer", with the file path and parameters.
→ Review it and click Allow (this task only), Always Allow (never ask again for this kind of action), or Deny.
Multi-Step Task (Experience the Agent Loop)
                      Help me organize my desktop files:
1. Categorize by extension (images / documents / code / other)
2. Create a subdirectory for each category
3. Move the files into the corresponding directory
→ The Agent automatically breaks this into multiple steps: browse folder → categorize → create directories → move files
→ You can see each step's tool calls in the conversation; the summary line (Took N actions · read X files, created Y files…) can be expanded
Step 6 · Enable Automation Capabilities
By this point you already know how to use the basic capabilities. Next are the app's unique "superpowers":
🤖 Scheduled tasks (let the Agent run automatically on a schedule)
Left navigation → Scheduled tasks → New Task. See Scheduled Tasks for details.
💬 Integrations (let your team use AI in group chats)
Left navigation → Integrations → choose Telegram / WhatsApp / Discord / Slack / Teams / WeChat / DingTalk and configure step by step. See Channels for details.
🧩 Tools & Skills (extend more capabilities)
Left navigation → Tools & Skills → Market → click + on a tool or skill to install it. See Tool Management and Skill Management for details.
🧠 SubAgent (configure specialized roles)
Settings → SubAgent → + SubAgent (such as "Code Reviewer" or "Documentation Writer"). See Subagent Management for details.
🛡️ Tool Level (adjust tool permission levels)
Settings → Tool Level → set each tool to P0 Auto / P1 Standard / P2 High-Risk. See Runtime Security for details.
Step 7 · Let the AI Remember You
In a conversation, say:
Please remember that I prefer to write code in TypeScript, with a code style of 2-space indentation.
The Agent writes this to your personal memory. The next time you start a new task, this preference can be injected automatically, and the Agent will naturally respond according to your preference.
In the app → Settings → Memory, you can view, add and delete memory entries, and switch to the Knowledge Graph to see how memories are connected. See Memory Management for details.
You can also set a nickname for yourself and the AI, and standing Custom instructions, under Settings → Personalization.
FAQ
Q: How does the Web client know the app is online?
Web client → Space Management → Work menu to view the node list. Your app should appear as a node with the name shown in Settings → Work Node. If you don't see it, check whether the app is logged in and the network is working (the Work Node page shows the connection status).
Q: Let my teammates use my app too
Set the Work Node type to Public:
- App → Settings → Work Node
- Switch Work Node Type from
PrivatetoPublic - Members of the same organization can then see and call this node
Note: Setting it to Public means your colleagues' tasks may run on your computer, including file read/write and command execution. Please make sure you trust your team members.
Q: Can I run multiple instances of the app?
Running multiple instances under the same account is not recommended — it creates multiple node registrations and may cause routing confusion. If you need multi-device collaboration, use one app per device.
Q: Can I use it offline?
Most features require a connection to the Gateway and the LLM API, so they are unavailable offline. Some local offline capabilities (such as a local LLM) may be supported in the future.
Next Steps
- To get a full overview of app settings → App Settings Overview
- To learn advanced usage → Conversation Interaction, Subagents
- To manage your organization → Space Management Overview